
We've told you before and you've likely come to this realization during your daily social media scrolling, but video content is taking over social media – and there's no exception when it comes to scrolling on Instagram. Instagram Reels have become a must-know format for social media users looking to expand their reach and create meaningful connections on the platform. Growing rapidly in popularity, this short-form, multi-clip, vertical video style is the step forward you need to take to bring your content game up a notch.
If you're not familiar with Instagram or you just simply don't know where to start with creating an Instagram Reel, don't worry, we'll take you through each and every step!
What is an Instagram Reel and Why Should You Make Them?
Instagram Reels are the perfect way to give your followers a creative, engaging glimpse into what you do or offer as a business or brand. Produced in short-form video format ranging from 3-90 seconds with multiple clips or images, they allow for an artistic conveyance of topics or campaigns that captivate your audience in seconds. Similar to TikTok, Instagram offers in-app, user-friendly editing tools. From adding captions, effects or music, to playing around with the speed of your video, there are endless ways to make a unique and engaging Instagram Reel.
Instagram Reels offer a unique and powerful opportunity for businesses to experience organic growth. Everyone is able to easily create professional-looking and highly shareable content within just a few clicks. Instagram Reels are particularly useful as they offer more than traditional posts, allowing businesses to not only showcase their personalities but also their skills, knowledge, and insights on various topics. Businesses can use engaging Instagram Reels to craft an immersive storytelling experience. Consequently, this makes Instagram Reels an incredibly valuable tool for anyone looking to organically grow and connect with their target audience.
Step One: Create a Plan
In this first step, you'll be referring to or maybe even refining your business's social media strategy. Either way, you will be creating a whole new section dedicated to Instagram Reels. Here you'll want to consider your business goals and how Instagram Reels will align with those, in addition to how Instagram Reels will fit in and align with your social media strategy.
Consider the following when creating your Instagram Reels strategy:
- What are you hoping to accomplish with them? You likely have some goals you're hoping to accomplish with Instagram Reels. Such as increasing engagement, reaching a larger audience, or accurately representing your product or service.
- Who is your audience? Consider your audience when thinking about the style of your content. This would include the audio you use, the trends that you partake in, and even the topics you highlight or discuss.
- What types of content are you hoping to create? Your content doesn't have to be one-dimensional. Maybe it's educational, inspiring, and funny! Or maybe it's only one of those. That is ultimately up to you.
- What are your competitors sharing? Research your competitors and take inspiration from them! Consider what might be missing in their content or how you would add greater value.
Step Two: Start Filming!
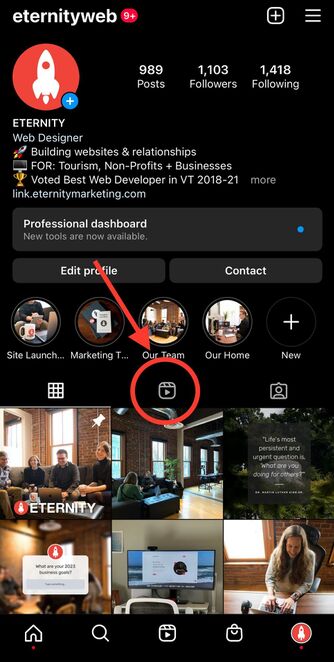
Now that you're armed with a comprehensive Instagram Reels strategy and an understanding of how it can be leveraged, your next step is to jump right in! Open up the app on your mobile phone and tap the "+" in the upper right corner, then click "Reel" at the bottom of your screen.
Now it's time to gather footage for your Reel. There are two ways that you can do this: create fresh content by filming it or draw from existing clips in your camera roll to craft a memorable masterpiece.
Film New Footage
With the Instagram camera ready to go, you'll notice your screen has many different buttons and gadgets spread around. Don't let that overwhelm you - they're all useful tools that you're going to learn to use! First, start filming by simply holding down on the round white recording button in the bottom middle part of the screen. As you do this, you'll notice a pink border will appear around the button. This indicates how much video you have filmed.
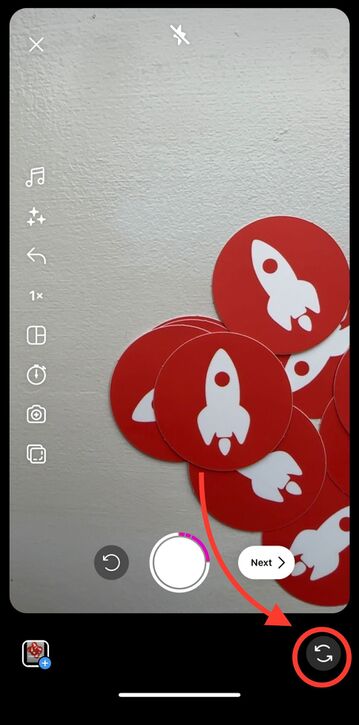
Right about now, you're probably wondering how you can switch between the front and back camera. Well, you can simply double-tap the middle of the screen or go to the bottom right corner and click on the double-arrowed button.
On the side of the screen, in a vertical selection, there are tools that you can use to creatively edit your content. From top to bottom:
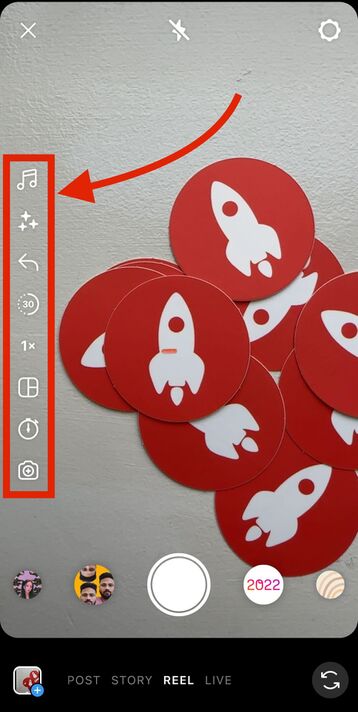
- 🎵 Music Notes: Click on this button to add music or original audio to your video. Here you can select from trending audio, saved audio, or even import audio.
- ✨ Sparkles: Click this button to add effects or filters to your video.
- ⬅️ Left-facing arrow: Add one of the newest Instagram features to your video, called "Add Yours" which adds your Reel to a public thread.
- 🕣 Length of Video: This button allows you to choose the length of your Instagram Reel.
- 1️⃣ Adjust the speed: Before filming your Reel clip, you can set it to a slower or faster speed.
- 🟥 Square Grid: Click on this button to change the layout of your clip. Here you can choose from four different layouts that allow you to add up to four different frames in one clip.
- ⏱ Timer: Click on this button to add a timer for the filming of your next clip. This is great for setting your phone down and backing away. You can also adjust the timer for the length of the shot you'd like to take, so if you're stepping away from your phone to film the clip, you can time the video to end at a certain point.
- 📸 Camera with +: Click on this button to open the dual feature. This will allow you to film yourself as well as what is in front of you at the same time.
Use Existing Footage to Make an Instagram Reel
If you're a business owner, it's likely that you already have photos and videos on your phone or on file (somewhere) that you can make useful by including them in your Instagram Reels.
First open up Instagram, go to the top right corner and click on the "+" button. Instead of clicking on the white record button to start filming, you're going to go to the bottom left-hand corner to click on the square image with a “+” sign on it and upload content from your phone's camera roll.
An important part of creating an Instagram Reel is making sure that it fits the size of the screen. So, if a lot of your videos or photos are horizontal simply select the "Scale" button on the side of the screen to fit the content to size.
Step Three: Edit Your Instagram Reel
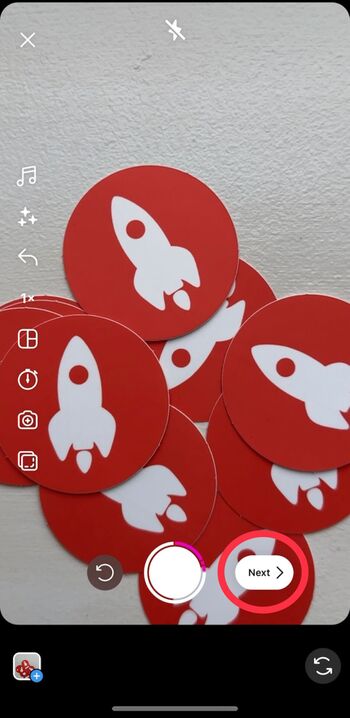
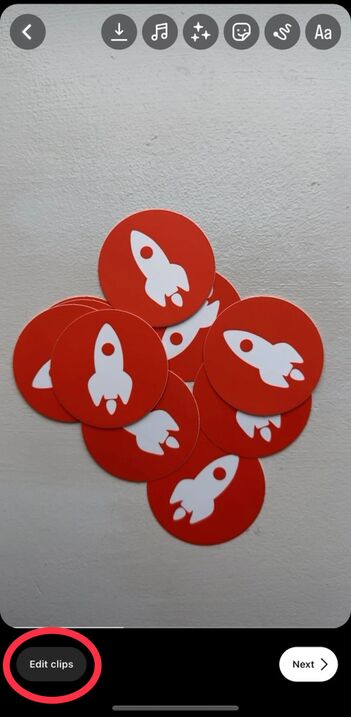
Now that all your clips are filmed or uploaded, it's time to start editing! You can do so by clicking the "Next" button.
Here you can:
- Edit the length of your video clips
- Edit the order of your clips
- Add music or audio
- Add closed captions
- Add text to your video or specific clips
- Add filters and effects
Edit the Length and Order Your Video Clips
First, you will need to click the "Edit Clips" button in the bottom left corner. Here you can make your video clips shorter, move them around, or even delete and add more clips.
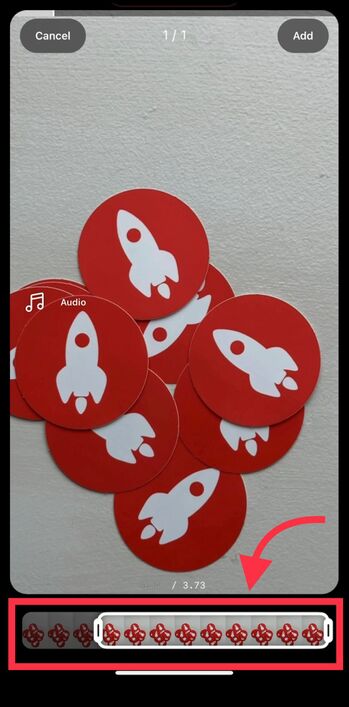
To make a video clip shorter, you will first tap the clip you wish to change. On the bottom of the screen, a bar will appear to be outlining your clip. You can drag both the left and right sides of the bar to edit out parts of the clip you'd like to remove.
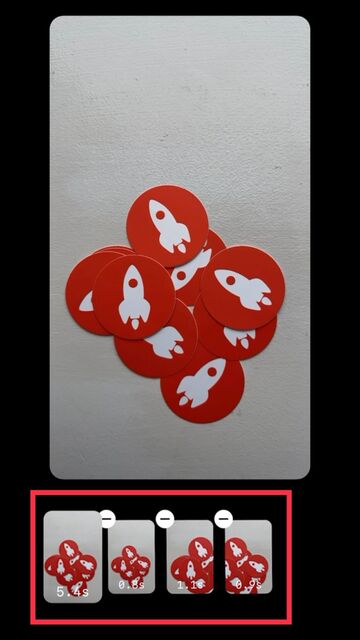
To delete, move and add video clips, you can simply tap the clip you wish to delete and click the "Delete" button that will appear beneath the video clip. Just as you would when moving clips around, you can hold down on the clip until the minus sign appears in the top left corner of the video clip. To add clips, simply press the "+" button on the right side of your existing video clips.
Add Audio to Your Instagram Reel
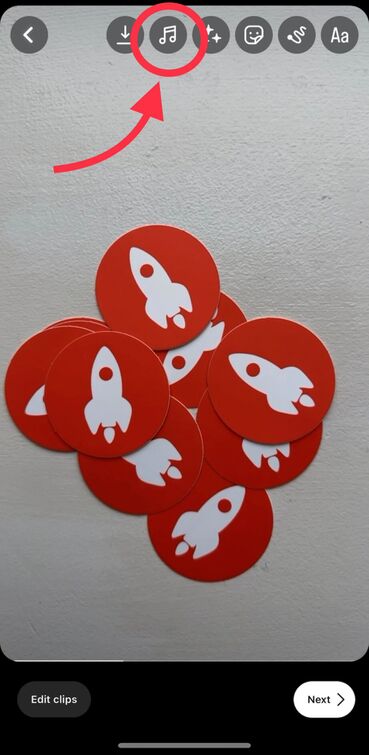
Instagram cares a lot about the audio of your Reels so there are a lot of options that you can choose from when editing. You can add music, original audio, sound effects, import audio from your phone, or create a voiceover by clicking on the music notes button on the top of the screen.
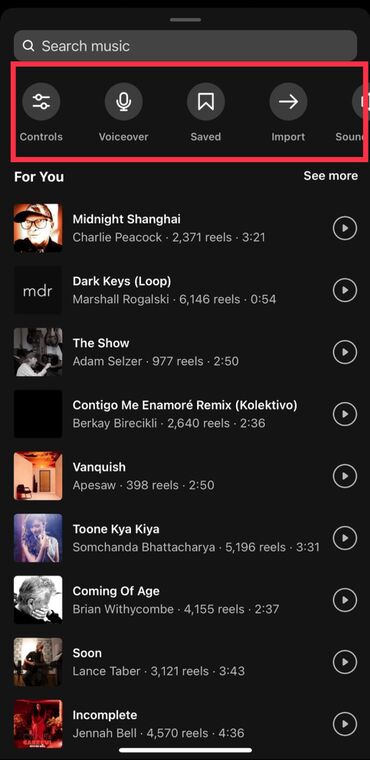
To add music, click on the "Music" button. Here you will see a list of different songs and audio that appear. You can scroll through and click the play button to listen to previews of the music or audio. Here, Instagram provides categories for different genres or types of audio such as: "Featured," "For You," "Trending" or "New Releases." If you are someone who saves audio as you scroll through your Instagram feed, you can find those saved audio in the top left corner by clicking the button "Saved." If you would like to import audio, simply click on the button at the top that says "Import" and you can import audio from your camera roll.
To add a voiceover, click on the "Voiceover" button. A red recording button will appear that will allow you to record your voiceover while you watch the video play. When you're done recording the voiceover, simply press the "Done" button at the bottom of the screen.
To add sound effects, click on the "Sound effects" button. A whole list of sound effects will appear. There are options like "Crickets," "Applause" and even "Tiny Violin." You can adjust these sound effects to occur at certain points in your Reel.
By the time you're done adding all sounds and audio to your video, you'll notice that Instagram allows you to apply them all on the same video.
Add Captions to Your Instagram Reel
Closed captions are a very important part of video content creation, especially when it comes to Instagram Reels. For social media accessibility and for those who are scrolling Instagram with their audio muted. If you're speaking in a video or have included a voiceover, always make sure to include closed captioning.
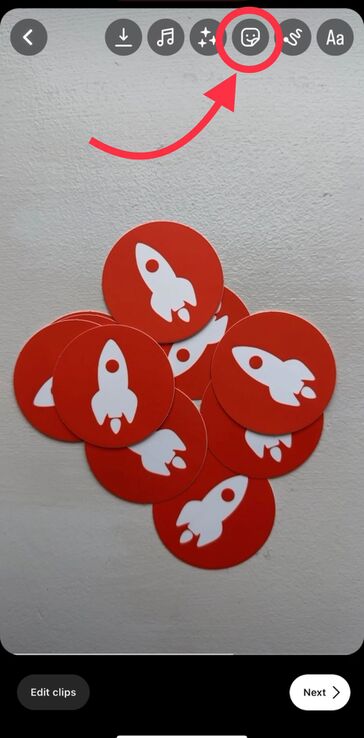
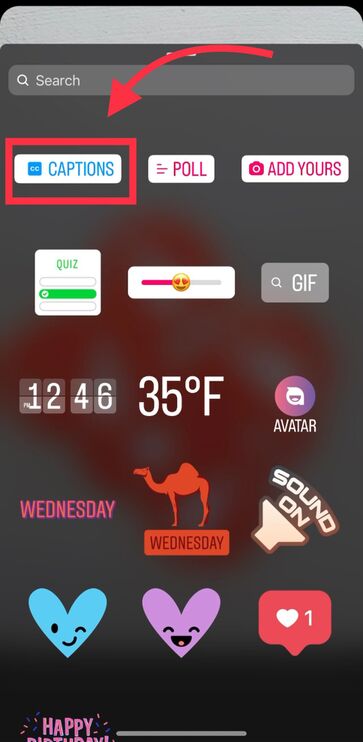
To add closed captions, click on the smiley-faced button at the top of the screen. Here a menu will appear with stickers and other interactive features like "Add Yours," "Polls" and "Quiz." These are all great features and additions for Instagram Reels but for now, click on the "Captions" button. Once you've clicked on that, Instagram will automatically transcribe your audio. Now, you can change the font of the words, the color, and the size by simply maneuvering the text with your pointer fingers (pinching and pulling) like you're trying to zoom in on a photo.
Before you go ahead and publish your transcribed Reel, make sure that the closed-captioning is accurate. If it is not, you can click on the text and correct any mistakes.
Add Text to Your Instagram Reel
Adding text to your Instagram Reel is a great way to inform your audience and allow Instagram to better categorize your content for the algorithm. Text is great when you don't want to speak in the video or simply want to give the video a visual title.
To add text to your video, click on the button that reads "Aa" in the top right corner of your screen. Now, you will have the option to type out your text and change its font and color. You will also be able to adjust the orientation of your text on the screen, add a shadow or background to your text, and add a typewriter effect.
Just as you may have done with the sound effects, you can adjust your text to appear and disappear at certain points in your video. To do this, simply look at the bottom of your screen, click on the text that you created and adjust the bar outlining the video by dragging the left and right sides. If you choose to delete the text, you can simply click on the text or hold down and click "Delete."
Add Effects and Filters to Your Instagram Reel
Sometimes you want to mix it up and add a black-and-white filter over your video content, or maybe sometimes you want to post a Reel but feel like you need a fun filter, or you saw a really fun Instagram trend and want to partake. Whatever the reason may be, there are plenty of effects and filters on Instagram for you to work with.
To add effects and filters, click on the sparkles button at the top of the screen. Now a menu of effects and filters should appear. You can choose from filters you've previously saved, search for filters, and add special effects. If you choose a filter and dislike it, simply click on the filter icon again and the filter will remove itself.
Step Four: Post or Save Your Reel
Now that you've hit "Next" out of the editing screen, there are a couple of things you'll want to edit before officially hitting either the "Share" or "Draft" buttons.
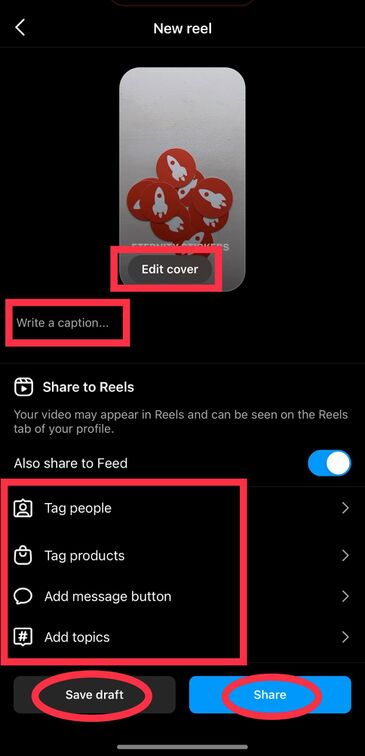
- Write out a caption: Make sure your caption is relevant to the video you are publishing. For example: If your video is educational, consider including extra facts or resources in the caption.
- Edit your Reel cover: Simply click the button "Edit cover" and include a photo from your phone camera roll or choose a cover by sliding the blue square to your desired cover image on the video. Then click "Profile Grid" on the top right corner to adjust the image.
- Tag relevant accounts or add a location: If you're posting about another business or got inspiration from another creation for your Reel, tag them by clicking "Tag People." If you want your video to show up under the search results for your location, click the button "Add location."
Now that you've made those last few edits, it's time to decide whether or not you want to post your Instagram Reel now or later. If you'd like to post it now, simply click "Share" but if you'd like to post it later, you can click the button "Save Draft" to save the video in your Instagram account.
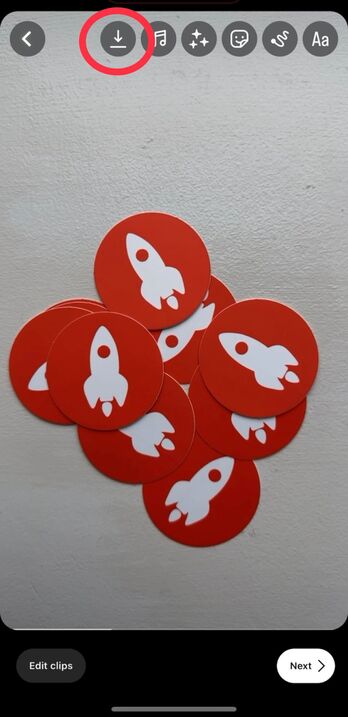
Something important to note: these Drafts will disappear if you log out of your account. To ensure that you do not lose your edits, simply go back to the editing screen by clicking the left-facing arrow in the top left corner. Now click the downward-facing arrow to save the video to your phone camera roll.
It's time to impress your followers and grow your community!
Now you have the tools and steps to craft interesting and captivating Instagram Reels. It's time to start connecting with your audience and provide them with an inside look into the world of your business.
Consider showcasing footage of employees or momentous occasions that exemplify the values and purpose of what makes your business what it is today. Countless businesses have used Instagram Reels to expand their customer base, strengthen customer connections, drive traffic to websites or stores, build awareness of products/brands and create long-lasting customer relationships. So why not let that be yours?
If you find yourself struggling to get through these steps or want someone to take care of your Instagram Reels for you, contact our team today!

